How to root the Samsung Galaxy S II (GT-I9100)

The successor to the Samsung Galaxy S - the Galaxy S II - is a beast in every terms. The handset blows every handset out of the water in terms of performance, and yet, maintains a waistline of only 8.49mm. Without a doubt, the Samsung Galaxy S II is the best Android of 2011.

Please read this before rooting your Samsung Galaxy S II-
After flashing a custom kernel on the Samsung Galaxy S II, a small exclamation mark will be shown every time the phone is rooted. This happens because the Galaxy S II has a custom counter, which keeps a track of how many times a user has flashed a custom kernel on his phone. The only way to remove this exclamation work is to use a USB JIG, which resets the custom counter to 0.

Here are the steps to root the Samsung Galaxy S II (GT-I9100) :
  • First of all you need to download all the required files. You will need Odin, the required drivers and the pre-rooted kernel. Odin can be downloaded from here, while for the drivers users need to install Samsung's KIES software. It can be downloaded from here.
  • The pre-rooted kernel – CF Root – can be downloaded from here (Post # 3,4 and 5). The latest version of CF Root can always be found over at this thread on XDA forums.
  • Switch off your Samsung Galaxy S II, and boot it into ‘Download’ mode. To do so, press the Volume down button + Home button + Power button simultaneously. The phone will warn you about booting into Download mode. Press the volume up button to continue.
  • The phone will show a warning that flashing a custom OS may harm the phone. Just press the Volume Up button to skip past the screen.
  • Once the phone boots into the Download mode, it will show an Android logo with “Downloading…” written below it.
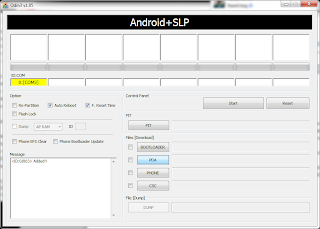
  • Now fire up ODIN on your PC, and connect your phone to it. Once your phone is detected by ODIN, it will display a COM port highlighted in Yellow color.

  • Then press the ‘Start’ button in Odin, and wait for it to flash the kernel on your Galaxy S II. The flashing process will take around 3-5 seconds to complete. Once the flashing is done, your phone will automatically reboot.
  • You have now rooted your Samsung Galaxy S II with a custom recovery (ClockWorkMod) installed, as well.

Steps to install Android 4.0 Ice Cream Sandwich Alpha ROM on your Samsung Galaxy S2

The first working Android 4.0 Ice Cream Sandwich based ROM for the Samsung Galaxy S2 is finally here! Continue reading this post to find the steps on how to install Android 4.0 Ice Cream Sandwich on your Samsung Galaxy S2.

Thanks to developer - @xplodwold - Samsung Galaxy S2 owners can enjoy an early alpha build of Android 4.0 Ice Cream Sandwich on their phone. Readers can read more about the ROM and see a video of it in action here.

Readers can find the download link and the steps to install this ROM on their handset below.

Before proceeding with the steps mentioned below, please make sure that you have a rooted Samsung Galaxy S2, else you won’t be able to install this ROM. Users can find the rooting guide here.

Steps to install Android 4.0 Ice Cream Sandwich Alpha ROM on your Samsung Galaxy S2 -:

Step 1: Download the alpha 6 version of the Android 4.0 Ice Cream Sandwich ROM for Samsung Galaxy S2 from here. Transfer this ROM to your phone’s internal memory.

Step 2: Restart your Samsung Galaxy S2 in Recovery mode. Users can use the Quick Boot app to boot into recovery mode. Alternatively, they can simply switch off their phone, and then press the Volume up + Home + Power button simultaneously to boot into recovery mode.

Step 3: First users need to format their phone’s /data, /cache and /system partition. To format the /data partition select the ‘wipe data/factory reset’ option. Format the /cache partiton by selecting the 'wipe /cache' option.
Format the /system partition by going into ‘mounts and storage’, and then selecting the ‘format /system’ partition option.

Step 4: Now, install the Android 4.0 Ice Cream Sandwich ROM on your handset, by selecting the ‘install zip from SD card’ option, and then navigating and selecting the ICS zip file which you had downloaded and transferred to your handset in step 1.

Step 5: Once the flashing process is done, repeat Step 4 again. You need to flash the ROM twice for it to work properly.

When the ROM is flashed navigate back to the main menu and select the ‘reboot system now’ option. The phone will take quite some time to boot.

Once your phone boots, enjoy Android 4.0 Ice Cream Sandwich on your Samsung Galaxy S2. Keep in mind that since this is an early alpha build, most of the stuffs are not working in this build including modem/baseband, capacitive buttons back lit and camera etc.
However, the build is stable around to give you a feel of what all changes Ice Cream Sandwich incorporates.

The developer is constantly working on improving the build, and I will update this post with the latest change-logs as and when new alpha builds are released. A new alpha version of the ROM should be expected tonight with calls, SMS and Wi-Fi working!
Steps to update your Samsung Galaxy S II (GT-I9100) to Android 2.3.5 Gingerbread

Want to update your Samsung Galaxy S II to Android 2.3.5 Gingerbread? Here are the steps to do so!

Officially, Samsung has not started rolling out the Android 2.3.5 update for the Galaxy S II. Unofficially though, quite a few Android 2.3.5 firmware have leaked for the handset.

The Android 2.3.5 firmware for the Galaxy S II brings quite a few changes including a looped home screen, blue over scroll glow, smoother performance and a noticeably better battery life.
If you cannot wait for Samsung to roll out the Android 2.3.5 update for the Galaxy S II, you can manually update your handset by following the steps mentioned below.

Before proceeding with the steps below, please keep in mind that your phone will be wiped clean of all your data including your contacts, SMS etc. while installing this new firmware.

Here are the steps to update your Samsung Galaxy S II (GT-I9100) to Android 2.3.5-:

Step 1: Download the latest Android 2.3.5 firmware for the Galaxy S II from here.


Step 2: Download ODIN from here. Also make sure you have KIES installed. KIES will automatically install all the required drivers for your phone. You can download KIES from here.

Step 3: Make sure KIES is not running in the background. Double click on the firmware file/ the .exe file, which you downloaded in Step 1. The .exe file will then automatically extract some new files inside a new folder.

Step 4: Start ODIN and then press the ‘PDA’ button. Navigate to the folder in which the extracted firmware files are present, and then select the file with ‘PDA’ in its name. Press the ‘Phone’ button, and select the file with ‘phone’ in its name. Do the same for CSC as well. Do not select re-partition and a PIT file. It is not needed. There is absoultely no need to touch any other setting of ODIN.

Step 5: Switch off your Galaxy S II, and re-insert the battery. Now, press the Volume down + Home + Power button simultaneously. Your phone will now boot into Download mode. You will be warned about flashing a custom OS, just press the volume up button to skip it.

Step 6: Now connect your phone to your PC. When ODIN will detect your phone, it will display a COM no. in a yellow glowing box. Once ODIN detects your phone, just press the Flash button and sit back. Your phone will automatically reboot once the flashing process is complete.

That’s it! You have successfully installed an Android 2.3.5 firmware on your Galaxy S II!
Owned & Updated by Mark Lester A. Alarcon; ©2010-2012 iDroid Services. Powered by Blogger.
 

Copyright © 2009 i-Droid Services Designed by csstemplatesmarket

Converted to Blogger by BloggerThemes.Net